
Preface
Preface
Thank you for taking the time to read this. Your time spent reading this will be paid back to you in full with all your future purchases of any guitar-related equipment because what you will learn next will save you wasting money.
If you are buying any electric guitar-related equipment, you should choose to get some good advice before you do. This information will do all that for you so that you can ask the necessary questions at the very least.
You don’t need to play guitar to use this information. You can learn everything here and not touch a guitar.
Those in the music business could make sure other guitarists or anyone interested in guitar recording add this reading to their list. It gets the guitarist and sound engineer on the same page regarding technical details.
At the very least, you will read tips that will get you going toward finally getting that tone you have been chasing for years since you heard it.
We don’t claim to be the only way or that our way is right. It is, however, a way that can work for everybody for any genre at any budget.
Glancing at the table of contents, you can probably tell this text will cover many points regarding modern electric guitars and recording. Electric guitarists must come to terms with sound engineering in some capacity, more so than acoustic guitarists, because electrical amplification is essential to electric guitar. In contrast, acoustic doesn’t require it; although acoustic pickups and microphone recording acoustic guitar are commonplace, electric guitar without electricity is the same as a system turned off. It has an interesting twangy sound that surprises many people when they first play electric guitar. Should that metallic resonance be there when they play? Yes, it should be, and it will never go away because that’s the environmental physics of you hitting strings. However, that is not the sound you want to hear, and it won’t either unless you turn on your rig with some electrical power.
The amplification of the guitar signal produces volumes that mask that pick-plucking sound. You’ll still hear it. If your amp volume is up, anyone else a few feet away probably won’t. If plucking on electric guitars not plugged in is your thing, get a hollow-body electric guitar instead of a solid body, like a Gretsch or Gibson ES. They sound best unplugged, which is suitable for practicing. If you liked that tip, you should like this text.
This text will use details and subtle equipment adjustments to fine-tune your tone professionally. We will only be going into detail with the elements of electric guitar tone that matter. What constitutes the guitar rig is not a drum or vocal rig but a guitar rig. Therefore, this text is not a sound engineer’s dictionary nor a guide to sound engineering every instrument at a mixing desk. That’s a good thing because we focus only on the guitar, and we can omit many things we don’t have to understand or in-depth to get the tones we want. So we concentrate and specialize only on the things that matter to the guitarist.
We won’t be telling you how you should perform on stage. We won’t provide you with a pathway for you and your band to make it big. That is for other manuals and texts. This text is about electric guitar rigs and how to use them, including mixing desks and during live shows, but only in the guitar context, especially for small room recording.
Some concepts might help with other instrument recordings, such as our chapters on microphones, audio interfaces, and DAWs (Digital Audio Workstation). Also, we shall not be going into detail about how to wire up internal guitar electronics, customizing your guitars, building an amp, modding an amp, modding a guitar, or repairing a broken guitar or a guitar with problems. That is for another text. However, when it comes to guitar gear you can get in a shop, this text is all about what you can do with it, especially integration. We provide you with options so you can make an informed choice based on a plan.
Hopefully, you are clear about what this text will and won’t be. Great. We are on the same page, literally.
Learning curves
I won’t say that electric guitar gear is not complex because it can get complicated, but the way to get through that is a combination of having goals and getting help when you hit walls. We all hit walls, need help, and learn all the time. That goes just as much for sound engineering as learning to play guitar. We all learn from each other. Very rarely do we discover something truly new. Get help when you get stuck because sometimes the solution is so specific that you will unlikely find it without much time and effort, which could have been better spent elsewhere. There is no such thing as the ultimate guitar guru or definitive manual. You got to pick what matters for yourself and work on it. We hope that even advanced guitarists can gain from this text and dial right into that pocket better by applying what they learn here. Nobody knows everything. Everyone has questions.
Costs
We also understand that guitar is no cheap hobby, and we don’t expect you to spend ridiculous sums of money chasing tones you can do a bit cheaper and a little more easily another way. You will learn about that big-ticket gear in this text and alternative affordable ways to obtain similar tones for less financial outlay.
Finger Callus Development
Even though I said you don’t need a guitar to learn from the text, it would be better if you started now along with it. The problem with starting electric guitar is that you need two weeks of developing calluses on your fingers before trying to do some larger string bends, chord shapes, and basic fretting correctly. The key to building these right away is slides. Just slide along a string with a finger, switch to another, and do it again. Then, finally, do all the strings with all the fingers. Never press hard, but just enough for the string to barely touch the fret. It doesn’t matter if you can’t play. Anyone can slide. Eventually, you will feel soreness. Stop. Now you need recovery for the calluses to build. You can usually play again the next day or, if not, every other day. Even professional guitarists who take extended breaks (which can be a good thing and usually is) must do this all over again. However, they usually know how to do string bends, so incorporate them into slides to develop calluses quicker.
Standard tuning high registry bends on a strat is the stuff of David Gilmour. It’s a killer sound but also a skin-shedder. I have been told that is precisely why so many Strat-playing artists tuned down half a step. Van Halen, Hendrix, Ratt, Smashing Pumpkins and Malmsteen.
Fret Hand Stretching
We will still need to address some things about guitar playing, especially for beginners, as we need to cover some primary conditions to help us with the technical side. For example, you will also need to have some physical dexterity developed to play the electric guitar. Practicing is all the aerobics you need to get into the same cycles of deep intensity and rest for repair. You will develop two noticeable things with your hands. The first are calluses on your fingertips, as we mentioned. The second is when you start with chords. Your finger stretching will start to span frets you didn’t think possible. You can play many chords that require stretching four fingers across several frets eventually. So why are we talking about this? It has to do with judging equipment. If you aren’t there yet in your playing, wait before judging your gear! That advice will save you money (buying the same thing twice after selling the first one a year ago or less). We have all been there. Trust me, it happens.
Starting Palm Muting
For example, palm-muting is a prevalent technique of using the strumming hand’s meaty side against the strings to dampen a note into more of a thump. You won’t hear that chug from amplifiers designed around handling that tone if you can’t palm-mute well. So don’t judge the gear until you can play better. That advice will save you from getting rid of the gear you should have kept. This includes pedals, strings, amps, and the lot.
Don’t worry if you can’t palm-mute well. Players who can palm-mute well still need to consider the sound engineering side to make the chug sound good. You take on this task by tackling it from two directions. Lessons training you to palm-mute combined with knowledge like this text’s tips on what gear and dialing-in you need to get you there. We shall give you some tips anyway because everyone wants to chug.
The 80s palm-muted chug requires several things to converge.
Bridge humbucker: Bridge gives the best position for a chug. Single coils are much harder to control here, so go with humbuckers if you can. Nearly all active humbuckers will do it. The majority of passive humbuckers also, but ones designed for higher gain are better. Some distortion is needed. You don’t need much.
Move palm and alter the pressure: You experiment with moving your palm’s flesh into different positions around the bridge area up and down, left and right, in and out with variable pressure (very important).
Pick location: Strike the string in different positions along the string for each new palm change position (very important).
It’s about all three axes for palm and picking. In most cases, placing the palm on the bridge itself usually gets you the correct horizontal access position and the vertical one to cover any string. Pressure is the axis you have to work on with gentle increments, not big changes, to find that palm mute tone you want.
Picking is primarily dependent on horizontal location along the string. How hard you strike depends on the tone you want. If you are doing this right, your palm will be in a fixed location, adjusting pressure and your picking fingers moving back and forth along a string and up and down across the strings. That’s the range you need to find palm muting sweet picking spots.
Find a load of different tones through minor adjustments in your palm and picking. If you can’t hear big changes with minor adjustments, then increase volume. When you have sufficient volume saturation with some gain, and you do this, you can hear micro changes. When you chug (repeat), these micro variations add up to a macro tone for each strike. That is how you can find lots of different chug tones on the same guitar with the same amp settings.
So that’s some tips on palm muting to get you started there.
Live Song Variations
Sound varies because the environment influences the tone, and it is difficult for guitarists to be precisely the same for every take. While guitarists can vary playing the same song, you can still get it tight, meaning as close to exactly repeating everything, the better for your band and the sound engineer. A quick tip here is that even if you play a genre or type of music nobody likes, you will still be considered a good band if you play tight together.
Some guitarists gig all year, and maybe they did something worthy of a live release that year. The best live take or best live gig is chosen from an extensive selection because all guitarists vary in how they sound on any given day. There is also a possibility of taking individual songs from different gigs, but there will be more variation in sound.
The whole band can vary in sound on any given day. The more we work to help constrain variations, the more we tighten our sound together as a band. A studio recording setup is one way to help constrain variations, tighten up this sound, and have the most control over your tone and final mix. Hopefully, this explains why the sound from live albums sounds so very different from the studio albums.
There is no reason why variation doesn’t also translate to your sound and tone. If you record yourself, you will sound different from your live performance. Some professional bands have their sound engineers work with the house sound system engineers to re-create their sound live. A poor sound engineer can easily wipe out a band’s perfect performance. So as a guitarist, it would be best to learn how to cooperate with your band and sound engineers. You have to get your social skills in order as you entrust part of your tone to others. Sound engineers are your friend, not the enemy. It is amazing how many guitarists strike up bad social interactions with their techs, and the quality of their end sound will not be the best the tech can make.
So again, the big moral of the story here is not to judge gear until you improve your playing. A guitarist who has put in the effort at lessons and training can turn a budget guitar and budget gear into something sounding like far more than it’s worth.
What gear to start with?
To begin, you need some gear. Next, you should know about GAS (gear acquisition syndrome). The guitar is addictive, and buying equipment just as much so. That probably has something to do with how the guitar is excellent therapy. You don’t have to be Jimi Hendrix to benefit from the results. It takes you away from the world for a while and even a little holiday from yourself. So you are going to be wanting more gear, and it is addictive. At least if you are going to have an addiction, you will still have the stuff after you use it, and it won’t go down the toilet, meaning you can re-sell it. Anyway, with GAS, too many pedals, guitars, amps, cabs, and watts, and not enough know-how to put it all together coherently and create a plan for future improvements. This text will help you understand how to plan some pathways for your lead or rhythm guitar tone hunting and performing, putting your GAS to good use.
Should I Learn Acoustic Guitar with Electric?
Keith Richards from The Rolling Stones often says there is much to learn from returning to the acoustic wood. Hollow body classic and acoustic guitars never grow old, and history beyond what this text could even comprehend or cover. Having one wood around is a good idea, even for electric guitarists. It would help if you got that feeling. The reason is that this is where many guitar riffs have their origins. Then the electric guitar is brought out, and the same riff is played on it and modified. I wouldn’t bring this up unless I haven’t heard many respectable guitarists like Mark Knopfler from Dire Straits say this. It is part of why MTV unplugged sessions were so popular, as many bands had initially figured out many of their songs on acoustic. Let me put this another way. Successful electric guitarists have incorporated at least a little time with acoustic woods into their guitar time. It isn’t that hard to do when you start to come to terms with the electric guitar. You can translate some things over with a bit of practice. Then there is another reason why we should suggest an acoustic in with your electric guitar collection. Even the most avid guitar fan of heavier genres will find acoustic on their favorite albums in an entire song or part. It doesn’t matter what the genre is. Acoustic and classical guitar happen.
An acoustic with steel strings, or if you want to play Spanish guitar, consider a classical guitar with nylon strings. You don’t have to have one with electronics or an acoustic amplifier. You don’t have to spend a lot of money here. Just a hollow-body acoustic guitar that stays in tune, and you can pick up and play without plugging anything in. It will become a practice guitar you can quickly turn to if you want to try and recall some passages you want to learn. Even electric guitarists practice their electric guitar work on acoustic guitars from time to time. Like alternating what you are learning, sometimes picking up and putting away the acoustic guitar a few days a month while playing and learning electric is acceptable as any good way to learn both instruments.
How much time to spend learning?
Hitting the one-hour-per-day mark playing guitar is not an unreasonable goal if you are serious about playing guitar. Professionals can do much more than this, but around an hour for many of us will be more than we need to ensure success. It will not be an hour of repetition, however. It will be an hour divided into planned subsections that last at most 30 minutes each and 15 minutes on average. If you timetable towards learning one hour per day like this, I think you have an excellent basis to springboard from and achieve any guitar-related goal you want. Planning helps. It will get you out of any situation that seems to be going nowhere, which is familiar with electric guitar. You can translate this to many other things in life. When you have progressed far in learning and training, playing all day long like many professionals becomes accessible.
Electricity is Dangerous
The electric guitarist has a most critical consideration from the onset—safety with electricity. We can all accept this is something we want to get right. Power conditioning is an excellent practice, even if you hear the complaint that it is just a fancy power strip with a fuse that trips if it senses a surge. Power conditioning also involves some filtering out of power irregularities. You may hear the terms dirty power and clean power. Dirty power is unconditioned power, and clean power is conditioned power. It is done with a professional power strip, some rack-mounted.
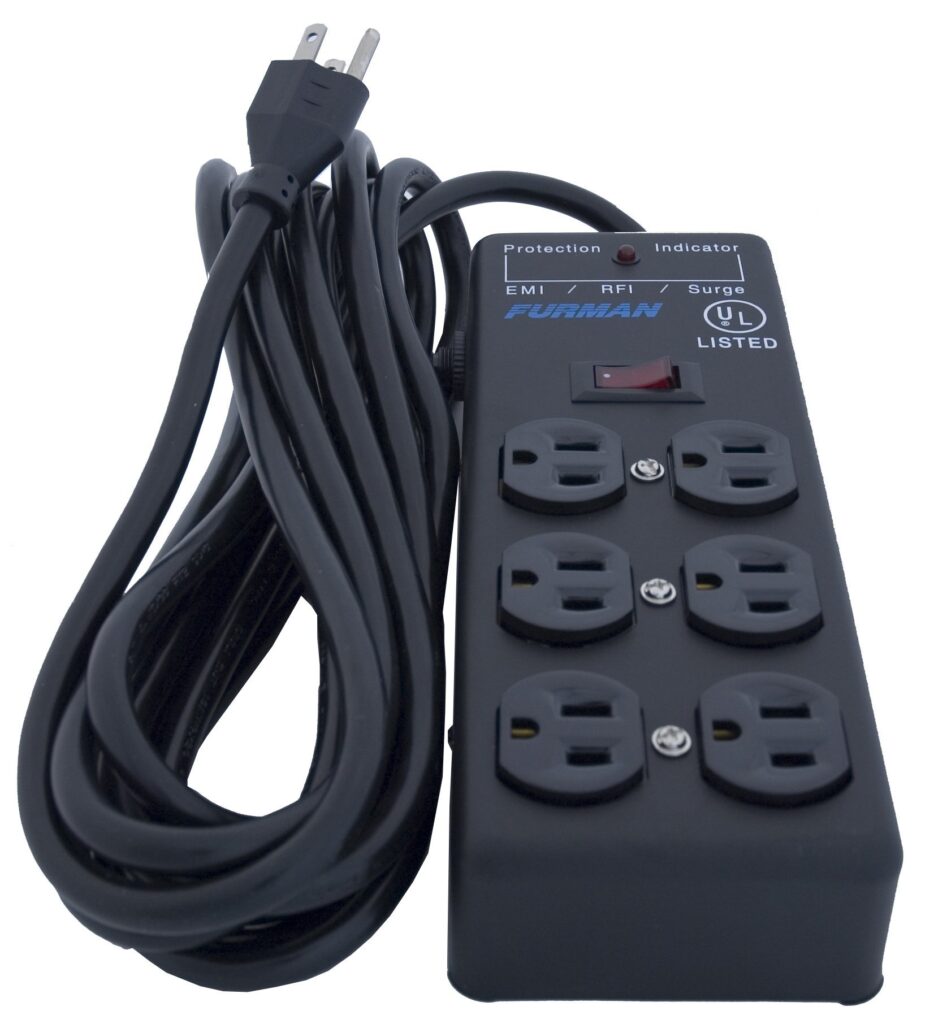
Furman Power Strip (SS6B).
When you order these, you should check the specifications to ensure the unit has been designed for your Country’s power type and connections. In most cases, when you order locally, they will be.

FurmanM-8x2a (front). Notice the four screw holes in the top corners. That identifies it as a rack-mounted device.

FurmanM-8x2a (back).
Hum, Buzz, and Unwanted Noise
Electric guitar equipment is so sensitive that it picks up electrical hum noise, especially from non-professional power outlets (plugging your gear directly into home electrical sockets). A power surge can blow your amp and the entire pedalboard if there is a serious power disruption, such as a fuse box not tripping correctly in a storm. Anything with sensitive circuits along the surge path is vulnerable. Everything will rarely blow, but it is theoretically possible. It would help to consider getting some power conditioning units before buying expensive electrical guitar equipment. You can start with a power strip on the floor with surge protection and then buy a better one musicians use to reduce guitar-related humming issues.
Too much equipment and gear have been returned to the shop because of noise and hum when it is the same common problem of not conditioning power sources effectively. Even if this is not the problem, it is still beneficial, and you have lost nothing investing in this insurance that also cleans up your sound.
A good quality surge protector strip is a good start and better than nothing. Get one and plug all of your gear into that one unit. Do not plug anything from the rig into another power outlet or risk losing the conditioned power. Everything from the one power source is how it’s done.
The power conditioning introduces a single step between the power socket and your rig to help solve hum problems. The better the power conditioner, the more silent your system will be, allowing guitar tones to get through without any unwanted noise. Why? Because amplifiers amplify everything, including what you don’t want!
Get rid of your problems at the source, or your problems get amplified instead of your good rocking tones. Some rigs may hum if there is a lot of distortion. Put your strumming hand on the strings. If the hum goes away, then this is normal. If not, then power conditioning is probably the issue. There are situations where some amps and pedals will hum. Usually, when volume and gain dials are up high. We will discuss this later, but you may need to use a noise gate if you can’t live with it. Usually, the noise is not there when you play if it is normal. The bottom line is certainly we don’t want it in a recording.
Sometimes you may have to use a computer system and USB connection to your rig. That brings in the possibility of hum from the computer even if the computer is also conditioned. There are USB power conditioning units, but a well-designed sound engineering workstation usually stops all hum and creates absolute silence. In the end, many guitarists might not go this far as to condition their computer’s power and instead rely on a professional sound engineer’s system to record without any artifacts. You will find that there are other reasons to use a professional service because high-end microphones or other gear is too expensive for most guitarists at home.
Professionals often use a portable, rugged case rack system with several slots and a mounted power conditioner in the rack. They tend to double as flight cases for touring bands. You must check the voltage type from country to country and switch your gear over to the correct voltage or risk destroying your gear. If you tour a lot, write a prominent note on the voltage on the pedalboard and amp and stick it there for all to see. There are advanced power supply units out there that are variable for any voltage but can be expensive. This text will help you factor in defeating unwanted hum into your sound systems.
What is electric about electric guitar?
Active pickups have a small 9v battery replaceable inside the guitar cavity by unscrewing carefully crafted coverings for internal access from the rear of the guitar. EMGs are popular actives for high-gain guitar playing, requiring a 9V battery. That, or possibly two batteries, is all the electricity any guitar will have internally. Using passive pickups means no electricity at all. Electric guitars don’t electrocute you but happen to make good conductors for lethal voltages.
Scientifically all you are doing as a guitarist is causing string vibrations. Those vibrations carry frequencies to the guitar pickups. Just vibrations transformed into weak electromagnetic signals. Since the electric guitar does not require external powering, it can produce electromagnetic signals from these pickups (wound magnets) in the middle of the guitar body close to the strumming hand. The pickup ‘picks up’ the strings resonating frequencies filtered and sends the signal through a guitar cable line output. This line out goes into a line in of an amp or pedal. The signal is processed into sound (our tone) by a guitar amplifier, speaker cabinet combination, pedals, or a digital system.
If we have a pedalboard, this goes between the guitar output and the amp’s input. It will also be powered.
Don’t worry too much about the terminology we use in this preface. We are going to go over everything in more detail later. Traditionally a quarter-inch jack plugged into the bottom of an electric guitar is connected to a cable, sending a weak electromagnetic signal to an amplifier’s pre-amp section for gain staging into a power section. That will be electric energy that can move parts of a speaker in a cabinet, pushing air outwards as sound frequencies we can hear.
The amplifier sends a signal down the speaker cable, and the speakers convert that signal into a stream of energy that physically moves speakers by vibrating them. This movement vibrates volumes of air passing through the speakers, filtering the sounds to produce the saturated tones of a satisfying electric guitar.
So it is the amplifier that we should treat with extra care when it comes to electricity. It is not uncommon to find professional bands playing relatively safely away from electricity using wireless transmitters. It also allows them more freedom to roam. However, pedalboards require electricity, so the guitarist may have to contact electricity by engaging footswitches. So be aware that there will probably be electrical power leads on the ground, especially where electric guitars are concerned.
The guitar pickups are mostly passive, meaning no battery is required. The electrical danger comes from elsewhere, such as touching exposed power. A qualified tech must check the damage to electric guitar equipment, such as the amp, before turning it on again. Amplifiers hold residual charges inside their components. So even unplugged, they can still cause a shock at lethal voltages. A 100W unplugged and opened is a dangerous system that requires expert care, although even lower wattages can deliver lethal electrical discharge. Amp techs can drain the excess charges from the system before handling the circuits inside. Lethal voltages are in solid-state digital amps and tube amps with vacuum tubes/valves inside.
The point is not to fear electric guitar rigs but to understand how to be safe with them. Read the manual’s warning sections. Do read them for guitar gear. You will learn a lot there.
Most tube amp owners will change pre-amp tubes by taking them out of an unplugged amp case with the access panel or hood unscrewed and removed. You should not need to take the amp apart or go near the amp circuitry and guts for tube changes.
Tube failure is mainly statistical. A set of tubes from the same assembly line, coming off simultaneously, can have one failing in a few months and the other in a few decades, even if the amp is handled with the best care.
The amp chassis compartmentalizes the circuits away from where you change the pre-amp tubes. Modern amps are designed this way. Very old amps might not, so be careful with vintage gear. You can change pre-amp tubes yourself. However, you might not change the power amp tubes without a bias change that depends on your amp. You may need an amp tech to bias your amp while changing the power amp tubes. Consult your manual or look it up to learn if your amp requires power tube biasing.
You can investigate the components of any guitar amplifier by looking at each brand and model online. Use keywords like inside amp or open amp and amp circuits.
Pedal Power
Pedalboards require power, so it is crucial to be powered safely with a reliable, protected system. The power conditioner we mentioned helps and should be involved with your pedalboard. This text will advise against daisy-chaining power cables to power multiple devices, such as a chain of pedals. Instead, we recommend using individual power cables wired into an isolated power block that often fits under your pedalboard. It would be best to power such a block using your surge-protected power conditioning strip here. This system is almost a failsafe way to remove unwanted hum. This advice alone can easily have a guitarist playing through a setup costing a few hundred sounding instantly better than a guitarist playing with noise and hum through equipment valued ten times more.
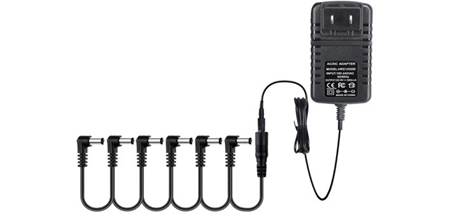
Avoid daisy chains. A typical low-budget daisy-chain power supply will make your pedalboard hum with noise when the pedals start adding up.

Isolated power supply for guitar pedals using discreet connections for each pedal. Read specifications to ensure it is isolated inside, not just daisy chains. Voodoo Labs make isolated power supplies.
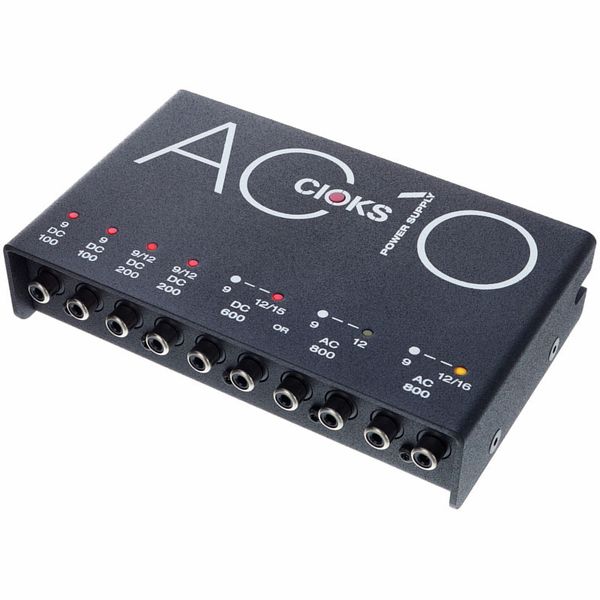
Cioks thin pedal power supplies are isolated, but use included RCA connections.
Electrical Hazards on Stage
Always get your gear to a tech when in doubt about electrical issues. Your local guitar tech will be invaluable here. Nearly every big town has someone who is always fixing guitar equipment. A lot of gear you buy will need some adjustment, possibly right at the start and most certainly later. Let someone else deal with the electronic repairs and fixing your guitar until you learn what a well-setup system is.
The common cause of guitar-related electric shocks probably comes from guitarists putting their hands into open electrical gear, touching gear incorrectly wired (grounded), or using damaged equipment. Storms can damage equipment. Drop the guitar if someone throws water or liquid at you and makes contact with you or your equipment. Don’t go near anything again until the power has been turned off on the whole stage. Liquids on your gear are a big problem. The reason is that liquid on the floor can become a conduit for electricity from damaged equipment. Water on your guitar makes it even more of a conduit. Stand away and power down immediately.
Microphones are notorious for electrocutions, some fatal. Make sure that everything is in working order to avoid shocks. Many singers leave the microphone on the stand and don’t touch it. If they must touch the equipment, like a mic, they use the back of their hand, not their palm and fingers, to check it. When you grab a faulty microphone, the shock can cause your hand to tighten around it even more. Wireless and battery-powered microphones are often the safest.
Playing in the rain is perilous and a poorly designed outdoor event. Many outdoor events play wireless with equipment well back from the front and sheltered in case of rain. Nobody should expect you to play in treacherous conditions.
Guitar headstocks are notorious for knocking things over and breaking simultaneously. So don’t put drinks on top of the gear. The problem is made even more dangerous because string wires on the headstock are running down the length of your guitar. These are what conduit the lethal voltage very quickly to your body.
So the point of all that is to explain how guitarists get electrocuted. It is not playing any guitar that does that. It is coming into contact with an open power source that transmits it or equipment getting wet or damaged.
An awareness of power safety is essential, and even if many guitar techs have gotten away with a zap here and there, it is better to be safe than sorry. Even Les Paul, the electric guitar inventor, found himself in the hospital, recovering for a year after putting his hand into an open radio transmission unit while still holding his guitar.
Keep Manuals and Organize them.
Reading the manuals correctly (meaning before you use equipment) eliminates many problems. I have a folder on my drive full of only manuals with notes about all my gear. You will need something like this as it is easy to forget settings.
Don’t rely on others not to adjust the dials on your gear. It happens, and you need your notes to return everything as you had it. Label equipment if you must. For those with phone cameras, take pictures, upload, label, and store them. Your dialing-in will sometimes be 20+ dials to contend with a well-populated pedalboard.
May I suggest a technique that you can start doing now? And in fact, we all can if we aren’t already. It is not uncommon for guitarists to sit down and doodle out a rig on paper with lines running to shapes and drawing labeled with an amp name and other lines to pedals and speakers with little notes to the side of each. These rough schematics are a great aid to help you learn things you want to remember, see how you can chain it all up, what cables you need, what inputs and outputs, power, etc. So please sketch your ideas and rig designs with your pencil and paper. These are essential tools, just as much as your guitar is.
Also, when buying gear, consider dimensions and weight. Time and time again, the amp head doesn’t sit on the cabinet as we hoped or on the shelf we prepared. Same with introducing a new pedal to a pedalboard or putting a power brick underneath. Measure your stuff out. Also, note the weight of the gear, especially combos. If you have to lug a combo around, ensure it is a weight you can handle. Some combos are extremely heavy and much heavier than they look.
If you have a problem understanding anything that follows in this text, skip ahead and go back to it later. You will usually find things covered more than once from different angles.
Happy playing. It is your electric guitar.