Chapter 14
DAW (Digital Audio Workstation)
We already covered computers and digital audio interfaces in previous chapters on simulations and the real deal for live performance and recording. This chapter shall get more specific about what you will technically need from your DAW. Here, you control and process all of your efforts for the final art form, which is electric guitar music. It must become art and not just a technical process which is something in the ear of the beholder. I won’t tell you how to be artistic, only that at some point, everything you do needs to transcend its technical foundation. For most guitar artists, though, the advice tends to be the same. You play from your heart. You play what you love. Whatever it is.
The bottom line is that I do not expect the home recording studio to feature more than a single 1×12 cabinet and two to four microphones (two dynamics, one cheap condenser, and one cheap ribbon) at the most for experimentation. You can use clamps to attach them to each corner of the cabinet if you want to hold all four somewhat close at the same time. You can use floor stands, and tilting stands to aim your microphones exactly how you want them. It’s the same thing if you use a 1×12 or 2×12 or even 4×12 in your recording space. Four microphones max are all you need in your collection to have an extensive amount of frequency coverage with various tonal differences between them.
Also, you can easily own several 1×12 cabinets, maybe even custom ones, and many speakers and swap them in and out, depending on what you want to do. If you decide to do this, I highly recommend you consider purchasing a handheld mini-drill to deal with the screws and considerably cut down your work. Turning screws by hand with a screwdriver and messing around with intricate metal parts like this is usually unsuitable for guitarists, mainly because of cuts and injury. You need your fingers to play. A mini-drill helps.
If you want your DAW software to record all four microphones simultaneously, you will need at least four microphone inputs in your audio interface. You will need to be able to phantom power at least one of those inputs if you have a microphone requiring 48v. It is usually a button next to the input in a higher-quality interface.
A good USB audio interface for the electric guitar will also be suitable for microphones and other equipment. Since many musical systems are analog, then a pre-amp technology on the input channel allows you to control the input level gain via a dial on the front of the unit. Digital technically doesn’t need a pre-amp as long as it remains digital such as a synthesizer connected to a PC. Digital systems also output at a line-level signal which can be carried through analog cables like a ¼” jack.
The audio interface comes with software allowing you some control over these, but that is how they work for the most part. Again such control may be limited to just the first couple of channel inputs. It all depends on what audio interface you go with.
Some audio interfaces may give you some XLR options and the remaining ¼” jack. They are for a budget-conscious guitarist and may have only two inputs with gain dials and limited advanced options.
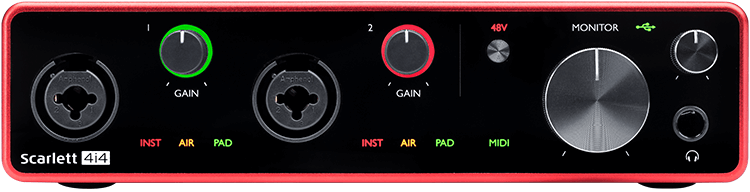

Focusrite Scarlett 4i4 (3rd Gen). (Top) Front. Two hybrid XLR/1/4” jack inputs 1 and 2. (Bottom) Rear. Two ¼” jack line inputs 3 and 4. 4 line outputs. MIDI in and out. USB.
Microphone connections are typically XLR. In the 4i4 example, only the front two inputs have XLR capability and happen to be the ones with the gain dials. The rear has line inputs but jack connections. These are the line-level inputs. Outputs 1 to 4 are all ¼” jack outputs.
You can easily use an XLR to ¼” jack adaptor if you only have a mixture of types of inputs available in your audio interface. You would have to use one of the front XLR inputs for any 48V microphones. You would use the microphone that needs the most gain control in the other XLR input with the gain dial. The rear two ¼” jacks for the remaining two microphones. Again, this is a budget option, and depending on the system, it can work out sufficiently for a home recording DAW. Preferably what you want are four XLR inputs with four gain dials and advanced controls on each.
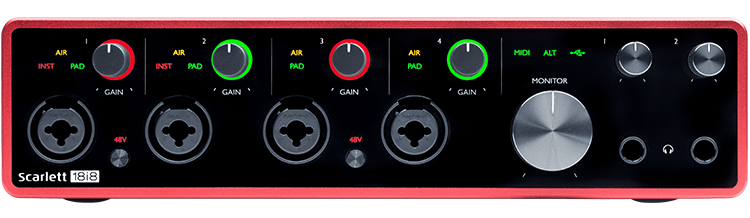
Focusrite Scarlett 18i8 (3rd Gen). Four hybrid XLR/1/4” jack inputs. Two 48V channels. Dual headphone monitors. You can easily use multiple microphones with this system.
The critical point here is that you should ascertain how many connections you will need for your guitar rig set up before buying your audio interface. It is a pain to invest in a new one every few years because you want to add more line and instrument inputs. If you think you will need lots of connections in a few months, get the rack unit versions and be done with it instead of replacing gear every other year. It is more cost-effective in the long run, and you spend more time learning the gear.
XLR line-ins can double as instrument or line level equipment inputs. There are no significant differences between the quality of the signal of a ¼” jack and an XLR connection). All that is going on here are industry standards appearing, such as microphones using XLR connections. Guitars using ¼” jack.
Once you have a sufficient signal amplified enough for your DAW software to process, you should see the waveform on the timeline of your channel’s track when you record it.
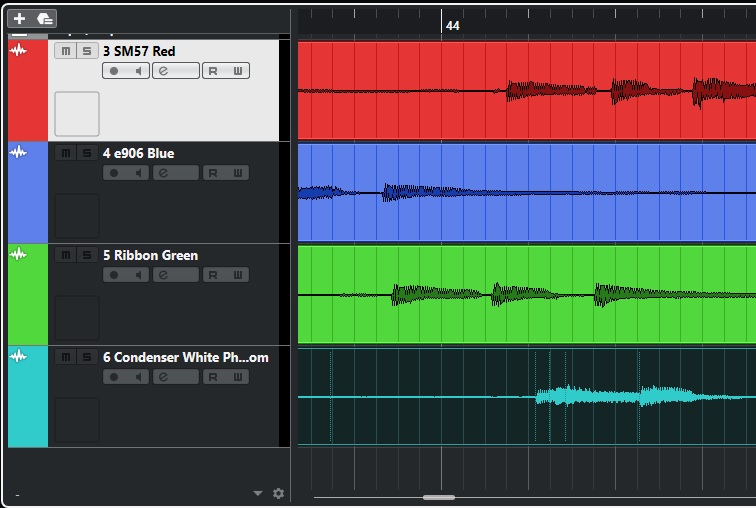
DAW interface and timeline on Cubase. Waveforms on track mean there is sound there.
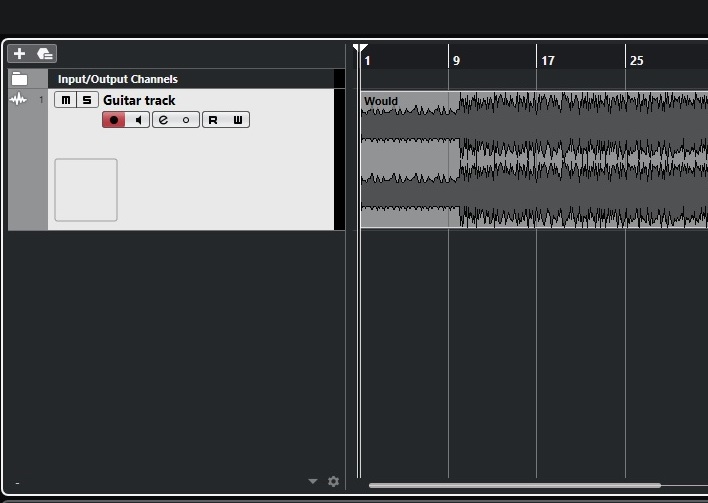
Cubase 10.5 Elements. (Top) The DAW software desktop layout has a timeline for instrument and equipment recording.

Cubase DAW software loaded with four input channels for microphones that are color-coded. SM57 on top. E906 next. Ribbon next. Condenser last (with 48v phantom power note). You don’t have to use colored tape on your microphones or colored leads, but this sort of labeling does help.
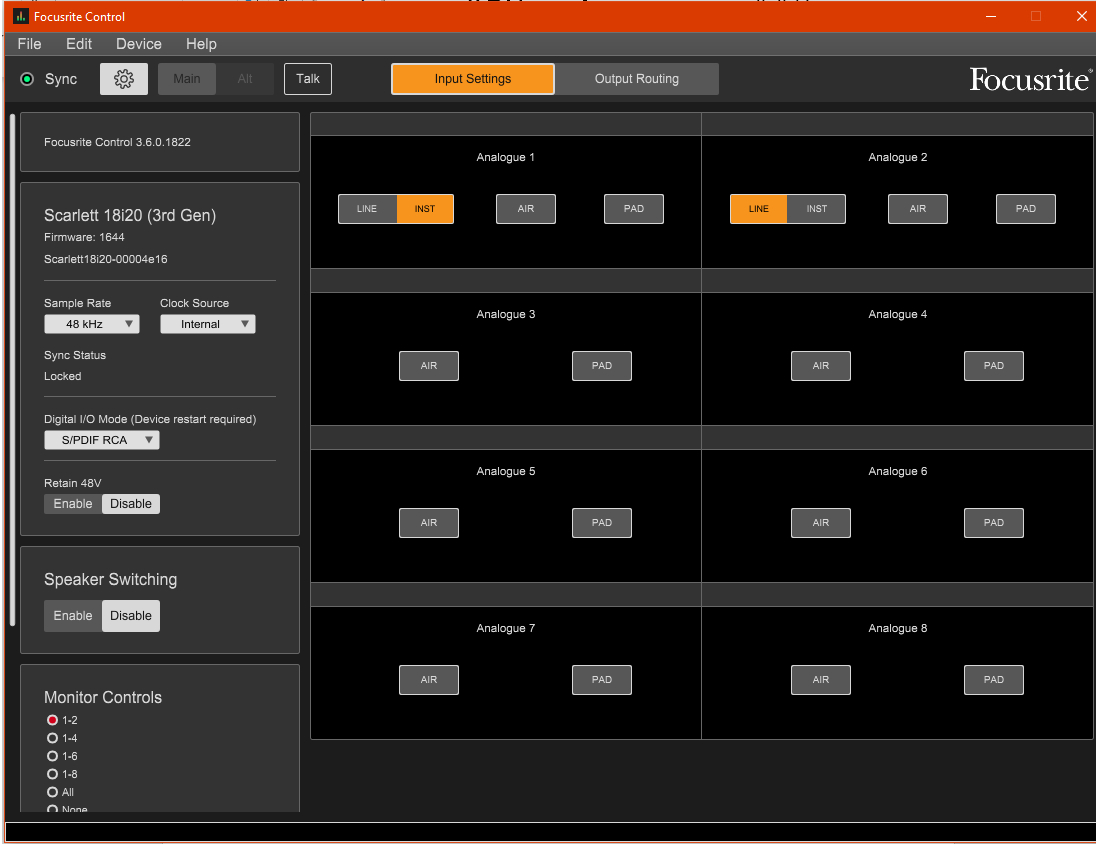
Advanced Digital Audio Interfaces come with software like Focusrite Control. PAD buttons. Sample rate choices. Clock sources. Digital I/O Modes. 48V control. Speaker Switching. Monitor controls. Visual display of each channel.
Do not forget to go back over the sample rates section again. You apply all that here at this stage.
The bottom line is to record a track that isn’t too weak and isn’t clipping. That is done mainly by adjusting the gain level of the input of the USB audio device. There is no point adjusting your amp as you have already finely tuned it for tone. So don’t concern yourself with the final signal for recording until you get that sorted out.
These are the fundamentals of how DAWs are set up to work. You may have seen videos of DAWs doing far more complex things than just setting up channels to record tracks. The complexity is just plugins/VSTs and using multiple ones. Each plugin will have an individual manual on using it, such as EQing, compression, delays, de-essing and reverb. You learn each plugin separately. Many plugins make the DAWs look more complex than they are, but laying tracks down is at the heart of the DAW. You will find most DAW software already comes with several tools and features, but you don’t have to use these and opt for other plugins instead.
Signal quality
Your signal should never clip. That is not a controlled distortion. A controlled distortion is a sound created by clipping, but that sound recorded is no longer a signal that clips. It is a regular healthy signal that keeps within parameters. So in terms of laying down a track, your job with the DAW is to avoid clipping by sticking with a healthy signal. Not only do you want a healthy signal, but you also want the best one. Where is it?
The answer is usually just before clipping. So finding clipping and then dialing back is an excellent way to find a healthy signal, strong and therefore containing the quality of sound you probably want as a raw guitar recording. If the signal is too weak, almost certainly you will need to boost the signal in the DAW after recording, but this also brings out all the poor artifacts and requires EQing to sound better.
You will almost certainly have to play a song a few times before you can detect clipping, as variation in playing can suddenly cause a frequency combined with volume to clip for a split second. Then, you have a choice of dialing back a bit to avoid that clipping, playing differently, or editing. By far, dialing back on the USB gain is the best option in most cases.
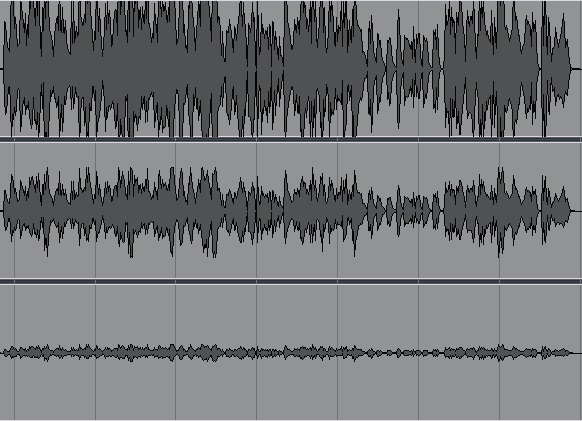
Three signal types. (Top) Clipping. Notice how the extreme areas cross beyond the threshold of the system? That will sound distorted. (Middle) A healthy signal that is strong and not clipping. (Bottom) A weak signal. You can hear it, but it will disappear in a mix. Increasing the volume after recording only increases artifacts you don’t want. The middle one is what you want in most cases.
When recording, make sure to set your channel DAW levels to 0 (the default level on all mixers) as this is line level. You don’t get your signal by upping DAW volume. DAW channel volume is for fine-tuning. For example, +-2 dB is all you should need if stuck with an audio input gain setting that could have been a little more or a little less.
Again don’t make it more complicated than this. The text is not about how to mix your tracks to make a great song. The text is about getting the track done sounding the way you want it to sound. Everything you have done led up to this straightforward recording process but getting it right is everything. All of your gear, all that money you spent, needs to make the final hurdle and jump it. A good quality signal helps make that happen.
Wet and Dry (the new synthesis)
A significant feature of digital modeling and attenuation is taking the output from the amp and bypassing the cab. Loadboxes and attenuators have an input that tells you this is where you usually plug into your cab but instead, it goes in here. The attenuator can be engineered to do more than soak up power and send a signal out to the cab, such as an audio line out for a DAW that will go into your USB audio interface. That is what we have been describing in the instance of many loadboxes we have covered already. If there is no cab simulator or IR applied to that line out signal, it is called a dry signal. That means correspondingly, everything we have been describing coming out from a cab, be it real or emulated, is a wet signal. We don’t need to use the word signal and call them wet and dry.
You may see the words wet and dry used for time-based effects, but this is different. When time-based effects are set to 0, this is a dry effect, and a wet effect is at max. So you have degrees of wet and dry that can be mixed.
Today wet and dry usually means you can split a signal from your amp with the cab as a line out.
There are two ways you can use that line out. The first is to apply a cab sim plugin or IR using your DAW and profiling software. The second is that you can leave it dry. So you can have two tracks operating side by side. Why? Well, some loadboxes allow you to make a cab selection within them before they get to your USB audio interface. So when you record with your DAW, you will be recording wet. Some artists also prefer having a dry track and adding the cab sim or IR to it after, making post-recording changes to that part of the audio.
Some post-processing mixing involves leaving that dry signal into a mix along with lots of wet, such as a wet/dry/wet combination—very experimental stuff.
If you are looking for a typical mix of things, the answer is wet/wet, also known as double-tracking.
Double tracking
Double tracking has a few meanings, which is transforming with the times. It originally was a way for an artist to play along to their recording and improve on it. The track that was the double is selected. It is not a duplicate or a copy or clone. It is is another take.
Double tracking can now also mean duplicating or cloning an additional track, although you may hear it being discussed previously. In the end, both methods have two tracks.
So double tracking in guitar usually means two takes, and the guitarist’s skills closely replicate the exact timing. If they don’t, then you will hear that, and it usually doesn’t sound good. So another take or heavy processing or editing is needed to sort that out.
You bring both to the same level, and that’s a basic double-tracked guitar mix. Many metal guitar music heard on albums is done this way. Sometimes the gain needs to go down more for each take. Gain thickness sought-after can come from the doubling of the tracks. That can explain why this technique is so popular.
You can also pan them, for example—a method popular with high gain music. Panning the double-tracking one track left and the other right. How much you pan each is subject to experimentation, but usually, they should be the same percentage left and right.
You can do a lot with two tracks. For example, decide to blend both tracks or edit them by splicing them up in the DAW. Anyway, the point is that double-tracking is a way to take your guitar recording to the next level. It forces you to play in time, and the more training you do there, the better your double-tracking will become.